MANUALS
Flexible tanks operations Manual
How to use FLEXIBLE TANKS/ FUEL BLADDERS
Please read these manual before installation THIS INSTRUCTION IS FOR FOLLOWING MUSTstore RANGES:- ILC TYPE : for storage of many kinds of industrial liquids, such as sludge, fertilizers, paints…
- HC / HCU / HCC TYPE : for storage of hydrocarbons, oils, chemicals…
 | Check out that the flexible tank range used is suitable for the liquid you have to store.
|
1 – CHOOSE THE RIGHT AREA: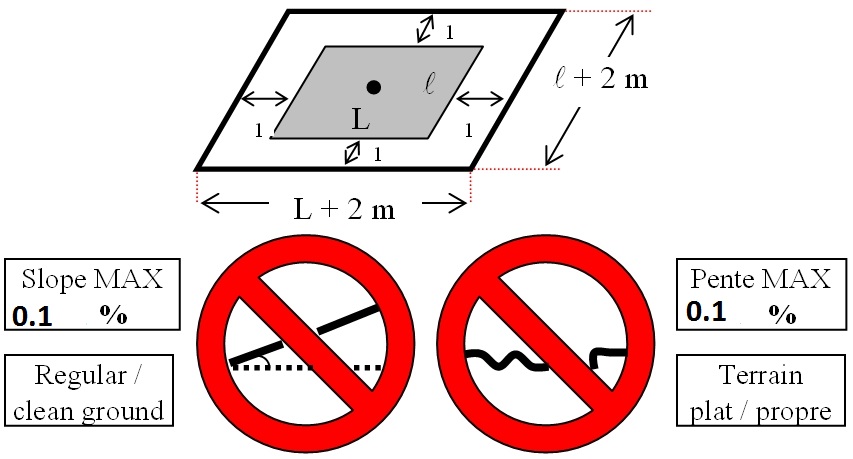

- bigger than the flexible tank (we recommend 1 meter in each direction).
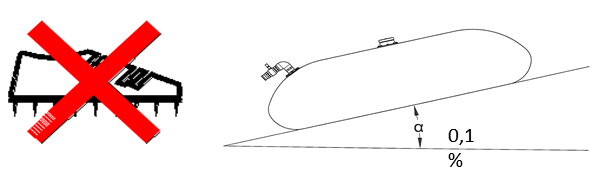
- Has a smooth slope between 0% and 0.1% MAX.
- shady.
- cleaned from any sharp or cutting part.
- kept dry.
- Can support the weight of the bladder
2 – PREPARE THE AREA
- Remove all stones or sharp parts from the set up area
- In case the liquid stored is contaminant or pollutant, it is recommended to settle the flexible tank in either a retention basin or a berm liner (optionnal equipment supplied by MUSTHANE).
| It is highly recommended to install the tank on a bed of sand (pure sand without stones or other sharp elements) and use a ground sheet or a non woven felt |
3 – SETTING UP THE TANK
- Position the flexible tank (folded) in the middle of the smallest edge of the implantation site
- DO NOT trail the tank.
- DO NOT use sharp tools, do not use tools that can tear the tank during positioning.
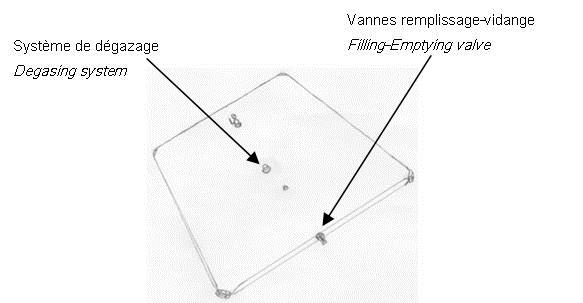
- Unfold the tank. Make sure the degasing system is on the upper side.
- The emptying valve shall be positionned at the lowest point of the area.
- Tighten the flexible tank skin in order to avoid folds.
- Use only soft and clean shoes. Prefer not to walk on the tank.
| To move the flexible tank, create an air layer under the tank by shaking the tank skin up and down. Prior to any filling step, visually check the external aspect of the tank skin. |
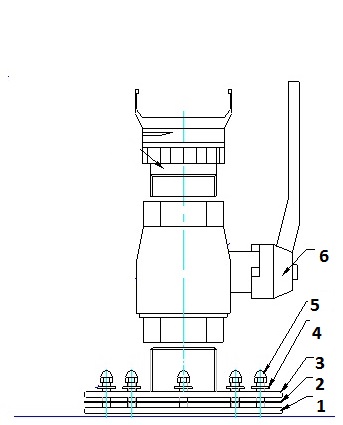
4 – FITTING MOUNTING
- We already equip MUSTstore ILC type tanks with the degasing system consisting in a vent with screwed cap.
- Every other fitting is supplied in spare parts and has to be mounted following instructions hereafter.
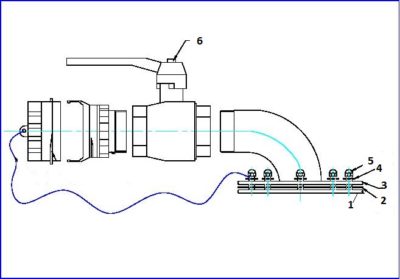
- Roll TEFLON tape on the male thread of the flange n°3.
- Screw the valve n°6 on the prepared flange. Make sure that the handle is positionned above.
- The mating flange n°1 is already prepared.
- Lay a supplied seal n°2 between tank skin and flange n°3.
- Screw the nuts and the cap nuts to a torque of 12N.m .
- Roll TEFLON tape on the male thread of the flange n°3.
- Screw the valve n°6 on the prepared flange. Make sure that the handle is positionned above.
- We already prepare the mating flange n°1.
- Lay a supplied seal n°2 between tank skin and flange n°3.
- Screw the nuts n°4 and the cap nuts n°5 to a torque of 12N.m .
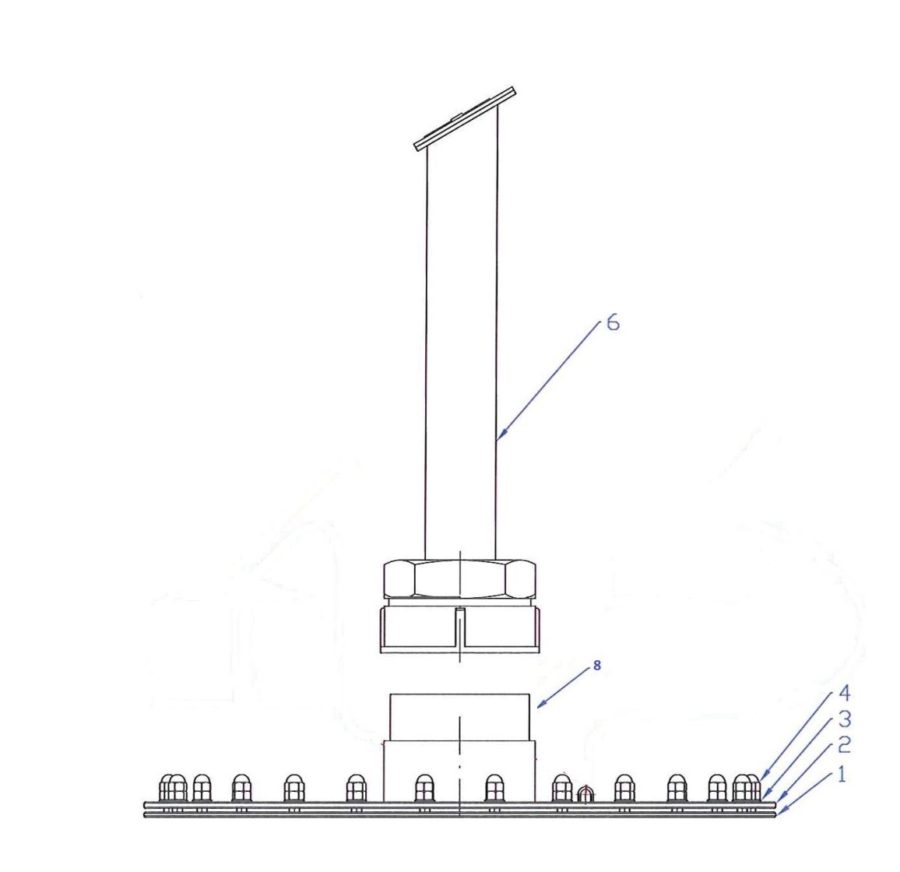
- Roll TEFLON tape on the male thread of the flange n°8.
- Screw the parts n°6 on the prepared flange n°8
- The flange n°1 & 2 are already prepared with their nuts n°3 and cap nuts n°4.
| Never modify or add holes on the tank skin. Tanks are ready for accessories set up Prior to any filling step, visually check the accessories. ESPECIALLY take care of non occlusion of degasing system. |
5 – FILLING THE FLEXIBLE TANK
- Connect the fitting to liquid supply with a flexible hose. ( optional equipment )
- Lock the coupling assembly with an hydrant key.
- Open the degasing system and keep it open during all the filling step .
- Turn on the valve. Fill the flexible tank until nominal height or maximum capacity .
- At the end of the filling step, turn off the filling valve. Keep degasing system open.
| The material of a flexible tank is never 100% impervious; oozing or staining may occur on the welding zone or skin of the flexible tank after the first fill DO NOT overfill a flexible tank. Comply with the recommended height when filled and DO NOT exceed. Contact Musthane if in doubt DO NOT fill the tank when the degasing seat is closed at risk of explosion of the tank Protect and caulk valves if the temperature is <0 ° c |
6 – EMPTYING THE FLEXIBLE TANK
- Connect the fitting with the emptying flexible hose.
- Lock the coupling assembly with an hydrant key.
- Keep the degasing system open.
- Turn on the valve for emptying.
- For a better drainage, fold the tank from the opposite of the emptying fitting in order to push the liquid down to the exit.
- Make sure that the degasing system is closed
| Emptying of flexible tank can occur both by gravity or pumping. In case of pumping, cautiously move the emptying fitting to prevent from collapsing. Do not handle or transport a flexible tank before it is totally empty. |
7 – REPAIRING
- The only reparation allowed is patch glueing when empty
- All flexible tanks ranges are repairable if the damage DOES NOT exceed 5 cm in each direction.
- Stains may appear on the tank skin due to weeping
- Use ONLY the repair kit supplied and follow the procedure « repairing an empty tank » in our detailed technical description.
8 – OVERALL CHECKING
- Before folding and putting back in storing conditions, visually check the tank by looking for holes, unwelded parts, cracks, mould fungus, punchings.
- If ever you notice one damage, proceed to tightness control according to procedure in our detailed technical description.
9 – PUTTING BACK IN STORAGE CONDITIONS
- Clean and dry cautiously the inside of the tank. (See the detailed technical description).
- Unset all the accessories. Only let the mating flanges with cap nuts on the flexible tank.
- Put protections on all metal or angular parts that could damage the skin of the bladder
- Clean the outside and dry with a soft fabric.
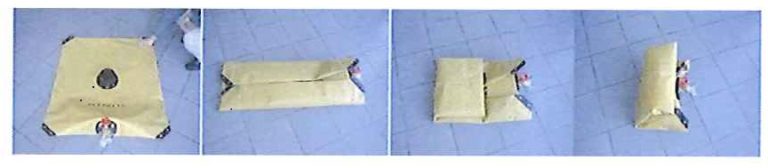
- Fold the tank according to pictures below then fold the ground sheet separately (temperature>0°C).
How to store and maintain fuel bladders?
- Store the folded, fully drained and dried flexible tanks in their boxes in a room protected from extreme weather conditions, aggressive steams and rodents at a storage temperature between -5 ° C and +20 ° C and a degree of hygrometry between 40 and 70%.
- Protect flexible tanks against sunlight, UV light, or strong artificial light.
- Clean with warm soapy water ONLY the outer skin of the flexible tanks after each use (never use chemicals, iron brush or high pressure wash) rinse and let them dry. To dry the inside of a flexible tank, we can offer you an optional ventilation drying kit
- Check that the tanks are not damaged (cracks, exposed canvas, cut-off, etc.). Contact Musthane if in doubt.
WE RECOMMEND YOU:
- MUSTHANE operating team to set up the tanks to :
- cover with an anti-UV cover the tanks used outside to optimize their lifetime.
- use a maintenance kit to increase tank’s lifetime.
- use a repair kit in load if necessary(optional equipment).
MSSB620
